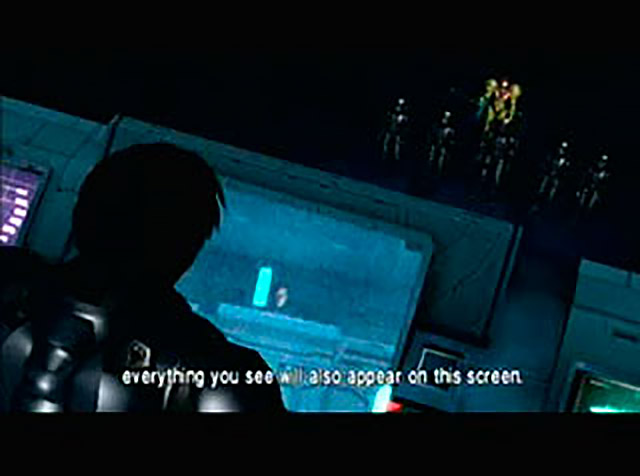
Ok, so this next scene, I don’t really know how to describe it. Adam gives the Space Marines their marching orders one by one, and as Adam addresses each Space Marine, the camera zooms in on them and displays their personnel information, like we’re reviewing each Space Marine’s Galactic Federation file. I don’t really know why this happens, and it all happens too fast to be interpretable, but I guess it looks kind of cool. If you think fast, blurry, information dumps are cool.
“Lyle!” Adam, barks, and we zoom in on the Schnozz. Adam tells him that he’s to investigate Sector 1 of the Bottle Ship, and we learn that the Schnozz is the “Special Ops” member of the “07th Platoon.” Adam tells him to “show a little restraint with the explosives.” So I guess in addition to hating bugs, he also likes blowing stuff up?
Then we move on to “Maurice!”, the Boring one, who has no distinguishing physical or personal characteristics. His assignment is to investigate Sector 2, and, since he’s the 07th Platoon’s engineer, his job is to repair any damaged equipment he encounters.
Then we move on to “Anthony!”, the Black one, who gets assigned to Sector 3. He’s the 07th Platoon’s “point man” and receives authorization from Adam to use his plasma gun if needed. Samus immediately gets jealous.
“James!”, the ‘Stache, is assigned to the Control Bridge. Which I think is the room that we’re in right now, in the Main Sector, but I could be wrong. James is in charge of communications, so his special assignment is to figure out what’s interfering with the Space Marines’ comm-systems.
The last Space Marine, “K.G.!”, the Nerdy one, is a recon scout, and his assignment is to sweep the residential quarters of the Main Sector and search for survivors.
Adam also gives his troops the go ahead to keep using their Freeze guns as they move out on their individual assignments, and reminds them to check in with the Bridge regularly by using the navigation booths scattered around the Bottle Ship.
‘So I hope you don’t ever have to, like, go to the bathroom or anything.’
Finally, we get to Samus, who does not get her own personalized personnel file shot, but does get her own individualized orders: “You go to the System Management room [and] do everything you can to get the electrical system back up and running.” Does this mean we’ll finally get some lights in this place? If so, Samus is totally on board. For whatever reason Because it uses super-secret Chozo technology, Samus’s comm-system is unaffected by the electrical interference that knocked out the Space Marines’ comm-systems, so Adam points out to Samus that he’ll be able to see everything she can see from his post on the Bridge. We even get a view over Adam’s shoulder, showing a computer screen that displays Samus’s POV staring up at him. I wonder if they had to hook that up special, or if Samus’s suit just projects her POV to any available screens at all times? That seems like a bit of a security risk.
Regarding Samus’s auxiliary weapons, Adam authorizes Samus to use her morph ball bombs, in addition to her missiles, but does not authorize anything else for the time being. Even though he let his own crew use their Freeze guns and plasma rays. Jerk. (Take a shot.) Adam pointedly notes that he has no intention of ever authorizing Samus’s Power Bombs, which “have the ability to spread a high-temperature heat wave over a large area” and could vaporize the Space Marines instantly if Samus isn’t careful. Perhaps given Samus’s… unique collateral damage skills, this is a wise decision.
Adam instructs Samus to report back to him on the Bridge once her mission to restore the Bottle Ship’s electricity is over, so that he can give her more things to do. With a final admonition to his team to exercise caution as they complete their individual missions, Adam ends the briefing. The Space Marines give the thumbs-up, and Samus wankeses to herself that this mission will be “the first joint mission [she’s] been a part of since becoming a freelance bounty hunter,” and also “the first time since [her] Federation days that [she’ll be] following the orders of a commanding officer.” It seems Samus is finding out the hard way that you can go home again, but your parents will still treat you like a teenager.
The Space Marines file out of the room, and Samus, instead of pulling that immature thumbs-down business she was known for as a child, wankeses to herself, “I felt confused and strangely exhilarated at the unexpected turn of events.” As Samus’s theme plays lightly in the background, she responds out loud, “Understood, Adam. No objections, of course.”

‘Hey! I didn’t authorize posing!’
Samus does a little pose, during which her visor turns opaque, and the map screen comes up to show Samus her next destination. It turns out that the System Management room is very close to the Bridge, and Samus will only have to backtrack through a few rooms, to the room with the mesh tube in it, to get there. We’re then reminded how to use morph ball bombs (turn into a morph ball and fire), and I’m given control of Samus again.
Samus heads south, exiting the Bridge and returning to the long, tubey walkway connecting the Bridge and the navigation room. The tube has been infested with Geemers since the fight with the Brug Mass, and once Samus dispatches them all, the mini-map in the corner of the screen flashes and a blue spot appears. A tutorial window indicates that “Blue dots on the map show the location of items,” and that “a blue dot will appear once all the enemies around that item have been defeated.” So, kill all the enemies, find out where hidden prizes are located. Sweet. Following the indicated blue spot on the map, Samus heads over to where one of the Geemers popped out of the floor, morphs into a ball, and rolls under the floor until she reaches a warped metal grate. Using her morph ball bombs, she destroys the grate and continues on to… well… a very phallic looking, neon blue object.
Dildo!
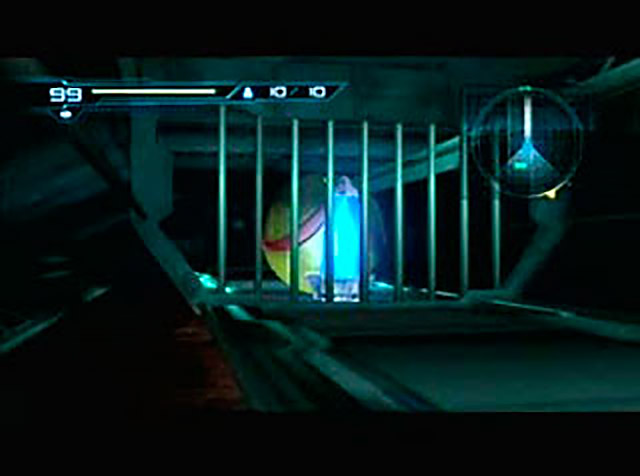
As she rolls into the glowing blue dildo hidden under the floorboards, a window appears on-screen to indicate that Samus has acquired a “Missile Tank,” which increases her missile-carrying capacity by one. Hey, a girl’s gotta take care of business somehow. As we’ll see throughout the game, Samus is quite the dildo aficionado, and will spend a great deal of time and effort ferreting out a variety of neon phalluses for her collection. More power to her, I say.
Samus exits the tunnel under the floor and makes her way back to the navigation booth to save. From there, she heads south to the giant elevator room, leaps down to the bottom floor, and continues on to the Geemer-infested catwalk. Passing through the hatch at the south end of the catwalk, she finds herself back in the (locked) room with the mesh tubing. Her map indicates that Samus’s destination is behind the locked hatch on the right, so after dispatching the Geemers in the room, Samus morphs into a ball and heads into the mesh tube, which leads up to run along the ceiling. Destroying the mesh grate blocking her way and snagging a fuchsia dildo, which increases her Energy Tank count by one, in the process, Samus heads to the end of the mesh tunnel and drops into the adjacent room.
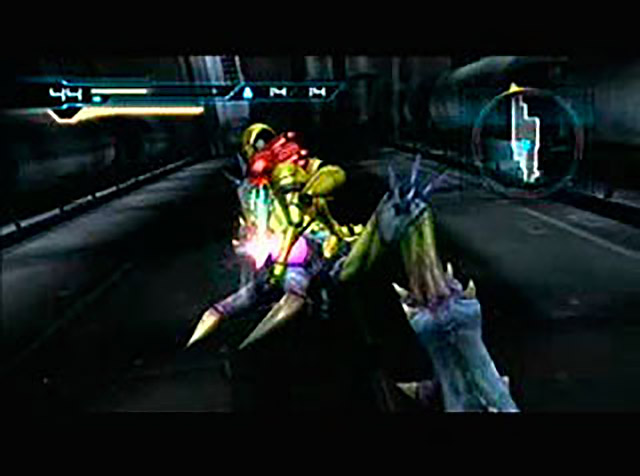
A helpful label in the bottom left corner of the screen confirms that Samus has reached the System Management Room, and Samus proceeds to an illuminated terminal opposite the locked hatch. When she tries to use the terminal to activate the electrical system, a swarm of Reos flies out of the generator to attack. Samus dispatches these without problem, but the killed Reos are quickly replaced by another wave. Samus destroys this wave, as well, and, switching to first-person waggle mode, fires a few missiles at the fleshy mass wedged into the right side of the generator that seems to be responsible for the Reos reappearing. This fleshy mass is apparently called a Fly Pod, and serves as a hive for the Reos, but it explodes into chunks after three hits, preventing the Reos from respawning. Samus repeats the process for the Fly Pod wedged into the left side of the generator.
Now that the Reos have been killed and the generator has been purged of Fly Pods, Samus can restore power to the Bottle Ship. She again approaches the illuminated terminal, and after a few seconds, the generator starts running. The main lighting system comes back on-line, finally, and the hatch behind Samus unlocks. Two things about this job. One, I’m glad that this mission only involved Samus being able to kill things, because aside from talking about her feelings, I’m not sure what kinds of technical skills she even has, and two, whose idea was it to have the door leading to the System Management Room be one of the few that is connected to the main power grid? Samus is literally the only person who could have made it into that room, and even then, it’s just because there was a conveniently placed tube leading to a vent in the System Management Room that she could roll into.

Do a barrel roll?
As Samus proceeds back through the unlocked hatch, her map activates itself to indicate that she needs to revisit Adam on the Bridge for her next instructions. Samus’ll get to that eventually, but she has some fabulous neon dildos to scrounge up, first! Activating the main power grid on the Bottle Ship unlocked the hatch at the south end of the mesh-tube room, so Samus proceeds south into the room with the broken elevator and glass on the floor. This room has been invaded by Reos and Geemers since the lights came back on, but Samus just runs past them to the south end of the room, emerging into the room with the glass-walled conference area. Samus heads into the conference area and uses her morph ball bombs to blow the grate off a vent on the wall. After rolling through the ventilation system for a while, she plunks down into a catwalk in the hangar. I like how there’s a vent that pumps air from the hangar directly into the conference room.

Who hid these dildos all over the ship, anyway?
There’s another neon blue dildo on this catwalk, which Samus adds to her collection, as well as an illuminated terminal that unlocks a hatch on the catwalk. This hatch leads to a narrow corridor connecting the hangar and the room with all the shipping containers. Once there, Samus kick-climbs her way to the top of the containers and spots another mesh-covered ventilation shaft. She uses her bombs to blow the mesh out of the way and rolls into a hidden room with another glowing blue dildo in the middle. Rolling back into the container room from the dildo shrine, Samus exits through the hatch at the north end of the room.
‘Yee-haw!’
From there, Samus continues on until she reaches the multi-storied room where she met her very first Reo, and she jumps down to the lower level to destroy the morph ball bomb plate she discovered earlier. Hidden under the floor is another blue dildo, and when Samus collects it, a bunch of Geemers appear out of nowhere to attack. Samus can’t return to her Power Suit mode while she’s rolling around under the floor, so she uses her morph ball bombs to take them out. What depraved member of the Bottle Ship’s crew booby-trapped their secret dildo hiding spot with Geemers? Presumably this would have taken place before the ship was overrun with monsters, so it just seems a little excessive, to me.
Rolling under the raised section of mesh from before, Samus leaps all the way up to the top level of the room and continues back to the room with the conference area. It’s amazing how much easier it is to navigate and kill things now that the lights are back on! In the room with the broken glass on the floor, Samus takes out the Reos and shoots down a few Geemers crawling around on the wall, Skulltula-style, so that she can kick-climb her way back up the elevator shaft unmolested. Wow, it’s really getting boring to just kill the same two monsters over and over again.